Aquatint Workshop 3 – focus on achieving better print quality

My third experience of aquatint.  My chosen focus in this workshop was on inking the plate in order to achieve better quality prints.  Over two days, I created only two plates but focused on the process of printing rather than plate design and creation.

This workshop occurred immediately at the beginning of the school holidays and I had had no time to work on a design beforehand.  As the focus was to be the printing process I elected to produce a simple abstract design.  There was a wonderful book in the studio entitled “Sculpture Garden Kröller-Müller Museum” which I used for inspiration for both plates. The design of the first plate is based on a photograph of a sculpture entitled “Phyllotaxis” by Sjoerd Buisman (1987).

This time, I improved the planning process by marking out the different stages of lacquer application ahead of time using the numbering system shown in the sketch below.  I was advised to use 3 stages for the first plate, which was then increased to 4 during the process. The lightest parts of the finished print are those marked “0” in the sketch.  These were covered with Abdecklack before the plate went into the first acid bath (concentrated iron (III) chloride solution is used). The plate was then submerged in acid for 60 seconds.  The parts marked “1” were then covered with Abdecklack followed, after drying thoroughly, 140 second submersion in the acid.  This process continued with two further stages, one using a 220s and the other a 360s submersion.  These timings were used in order to achieve more contrast.

The design used on the plate was made freehand as the process went along and is rather more abstract than the original drawing! I did not think to etch it first – forgot that I had done this last time – so there are no etched lines on the finished plate, only aquatinted shapes. The back of the plate is protected from acid damage by tape, which is removed prior to printing.

Img492

I took photos of the plate during the second and third stages:

Screen Shot 2013 07 19 at 19 29 49

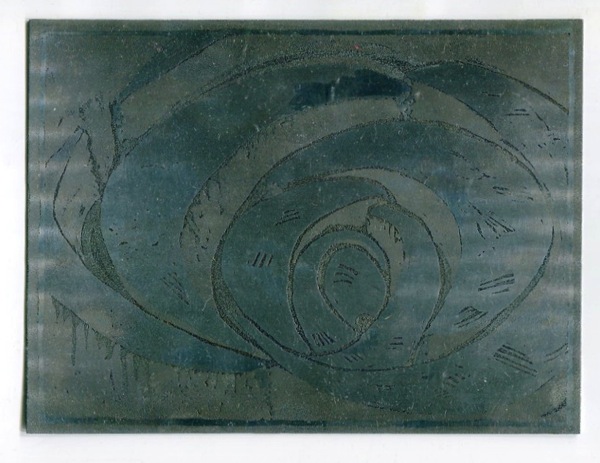
This is a scan of the finished plate after I had made several prints.  It needs a good clean before being used again but the residual ink helps in the reproduction of the scanned image. Not sure if lack of good cleaning immediately after printing damages the plate.  Suspect it does if the ink dries within the crevices; at the very least, it must make it harder to clean.
Img507

The focus was to learn to ink a plate properly.  The four images that follow are of the four prints that I have made so far from this plate.  In the first one, even though the first print is always the weakest, I have removed far too much ink from the plate but include it here for comparison.  The second one is better but I don’t like the white parts – too stark. I am pleased with the third print and with the colours used for the final one, which are quite well blended and give the image some depth.  The trick is to work the ink well into the plate in the beginning, and then distribute it evenly on the plate and remove the excess using only gentle pressure. I removed the excess slowly and gently using the palm of one hand and clean pages of a telephone directory!

Img500

Img499

Img495

Img501

Barbara Hepworth’s 1958 sculpture Figure (Archaen) was the basis of the second plate. I decided to etch this plate prior to creating an aquatint.  The initial sketch is shown below:

Img493

Unfortunately, probably due to a combination of too thinly applied lacquer on the plate and a damaged brush, the plate became scratched during its first immersion in the acid bath.  Not having time to begin again and also out of curiosity to see what might be done with the “added texture”, I decided to continue.  Here is the first print of the etching.  I like the basic form of Hepworth’s figure, and of my interpretation of it, so was somewhat disheartened at this stage.

Img496

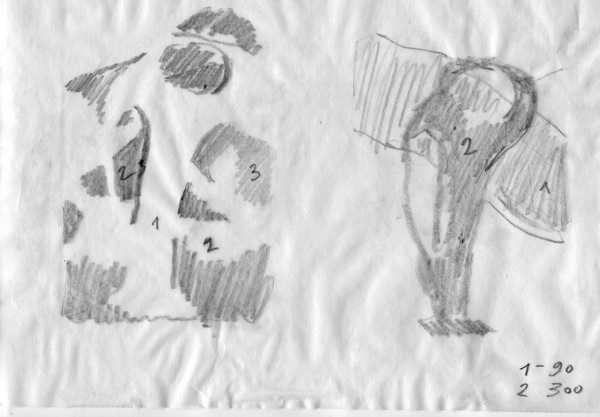
At this point I received assistance to help salvage the plate.  Tracing paper was placed over the plate and a couple of ideas tried out.  I decided to darken the figure, where the heaviest amount of scratching lay, which is the opposite of what was originally suggested.
Img494

The image below shows three stages in the making of the plate.  I had decided that the main image would be dark, hence this part of the plate remains free of lacquer, in order that the acid can “bite” here to the fullest and, hopefully, reduce the impact of the scratches.   The timings were 90s, 300s, 360s and an even longer exposure.  Am embarrassed to say that I did not write the last two stages down and it is too long ago to remember accurately.…oh dear!

Screen Shot 2013 07 19 at 22 00 10

Here is the finished plate after a couple of prints had been made (scanned image).  The need to make the central image dark, gives the odd impression of light coming in from the right hand side of the plate.  Unusual but OK.

Img506

There was time to make two prints, using the slower process described for the first plate, above. The impact of the lines has been reduced but not eliminated.  I would like to have another go using this imagery.  However, it occurs to me that there may be copyright issues regarding using someone else’s imagery, even if reinterpreted in another medium. The first print was a bit “splodgy”, to use a technical term….

Img503

In the second print, I used up inks that were available on the “inking table” so it is a mixture of sanguine and a green shade. The ink is still not evenly distributed, which is in part due to my lack of skill and technique but, probably, is also partly due to the unevenness of the surface of the plate in the figure. I like the background design, which is an abstraction of the evergreens against which the sculpture was displayed in the photograph that I used, and also like the diagonal tonal band across the plate behind the figure (someone else’s idea).

Img504

Afterword: I had not previously heard of the Kröller-Müller Museum, which is situated in the beautiful De Hoge Veluwe National Park in the Netherlands, prior to the workshop but will try to visit both museum and the National Park in the not-too-distant future.

Printing Workshop

I spent the weekend learning how to make an etching at an artist’s studio in the Tapeten Fabrik in Bonn-Beuel. Petra Siering led the workshop. This was my first attempt at Radierung (etching) and my goal was to experience the process and learn how to do it rather than to produce a work of art…Goals should be realistic!

The steps are outlined below, with photos of some of the stages. We worked on zinc plates. I prepared two plates by two different processes and each one is described below. I did not set out to document the process and all bar one of the photos – the aquatint plate at an intermediate stage – were taken at home later.

Plate 1: the first plate was based on a drawing which I transferred using graphite. The image occurred to me while coming home too late from work the night before. As I stood at the traffic lights, waiting for the green man, I noticed that all of the windows of an apartment block on the opposite side of the road were reflecting the trees against the dusk sky. I decided to try abstracting this image, perhaps with too many windows, perhaps different shapes and irregular spacing, but showing entire trees reflected up the height of a building. I initially sketched this rough image:

Initial sketch of window reflection idea

I was advised to make the windows larger and to make the door more interesting. I tried adding steps to the door, and to leave the door ajar.

Finally, I thought that I had the drawing as I wanted it. The first stage of making an etching is to transfer the drawing on to a lacquered plate. I transferred it by rubbing graphite on to the back and then drawing over the image again. I can see flaws in perspective of this drawing, especially in the middle – it is not entirely clear where the eye level is and it should be below the top of the door.

Developed drawing used for the etching

Once the image is transferred, a fine etching tool is used to go over the lines and through the lacquer to the zinc. I made a couple of mistakes at this point – drawing curves freehand is especially challenging. I also realised that I had taken an “Escher” perspective with the steps! The sketches below show my attempts to get the angle of the open door, and the steps, right.

Trying to get the doorway right...

All was not lost… it is possible to take a fine brush and repair the lacquer, although if you are not careful, and have rinsed the brush in turps, it can take more lacquer off…. Once the lacquer is dry, you can re-draw your design. I realised at this point that the problem I had had with the steps had been due to starting them too low down. It seemed too complex to correct and a larger mistake seemed imminent… so I decided to simplify the doorway and took the steps away. This seemed a pity because they had served to connect the building with the negative space in front and made the shape of that space more interesting. However, I could not see clearly what I was doing with all the extra lacquer and graphite and, post-printing, I am glad that I took that decision.
I considered adding texture / structure to the reflection of the trees but could not be sure and rather liked the strong lines, so left it at that.

Eventually, the repair job seemed to be as good as it was going to be. I reminded myself that I was doing this for the experience…

The next thing was to cover the back of the plate with duct tape so that the acid bath I was about to immerse it in did not etch the back. I placed the plate in a concentrated acid bath for 9 minutes, all the time brushing the surface to help the acid reach into the drawn lines and etch the drawing in the surface of the zinc. The plate was then thoroughly rinsed in clean water and dried; the duct tape was removed and the lacquer rubbed away using turps on an old rag.

At this stage, the “final” etching was visible. This was both a joyous and frustrating moment as you see your image etched into metal and then realise that the lines you thought you had erased have also been partially etched! (Remember – the journey is the goal!) However, this is where I discovered the robustness of the process. It is still possible to correct mistakes by filing the unwanted lines away gently and then polishing the surface with a polishing tool and steel wool. Finally, my offending steps all but disappeared.

Before printing, the surface must be oiled, to help the printing ink enter the etched lines evenly. The ink is then rubbed into the surface of the plate using cotton gauze. Finally, the surface is wiped clean of smudges and the plate transferred to the bed of the printing press. Damp cotton paper is placed on top, taking care with positioning so that slightly more space is left at the base. Another sheet of paper is placed on top of that, followed by two blankets. The printing press shown here is very similar to the one I used today.

Printing press

The wheel – like a capstan – on the side of the press is turned clockwise so that the plate and paper pass under the roller at high pressure. The wheel is then turned anticlockwise to reverse the process and pass the plate beneath the roller a second time. You do feel a bit as if you are sailing the high seas when you use it!

The first print came out a bit grey but the second one was cleaner and is shown below. I like the way in which the trees are aligned through the windows at the different levels and the increasing complexity of the image from lower to upper levels. The photo does not show the lines very distinctly – they are clearer in the print.

Second print of etching

At this stage, I had the option of adding aquatint in order to add some texture to the trees but decided to leave it. I quite like the option of playing around with copies of the print to see how the image could be developed with texture and colour, perhaps using an iPad app, before committing to more permanent change to the plate. I have not photographed the print due to its highly reflective surface, which gives no information in a photographic image.

Plate 2: I wanted to experience aquatint and so wprked on a smaller, second plate. The aquatint process is done in two stages and is painted directly onto the plate using a lacquer (Abdeckungs Lack auf Deutsch). I made a second experimental plate in a simple, geometric design. In this process, the plate is prepared using a resin, Kolophonium. The resin is sprinkled evenly on the surface of the metal, which is then heated up until the the resin bonds to the surface of the metal.

The etching process is done in two steps and results in three tones in the final image. The first stage involves painting a design on to the surface using lacquer. This image will be white in the final print as the lacquer and resin will come away from the metal later in the process, leaving a bare polished surface, so you need to think carefully about the design – how much white space do you want? I had drawn a design beforehand but found it very difficult to visualise how it would develop through the two stages and, eventually, abandoned it and decided to just “go with the flow” and see how it turned out. The back of the plate must be protected with duct tape, as before, and is then immeresed in concentrated acid, brushing constantly, for two minutes. The plate is then washed thoroughly and dried. You can now add more lacquer. Whatever you cover with laquer at this stage will remain a mid-tone grey in the final image and whatever is left unlacquered will be the darker grey tone.

This is what the aquatint plate looked like at this intermediate stage. The coppery colour is the first application of lacquer after the acid bath. The greeny-brown (actually a sepia – black colour in reality) is the second application of lacquer before the next acid bath.

Intermediate stage in the etching of an aquatint

One more acid bath follows… this time for eleven minutes. After washing, the surface is scrubbed with turps, to remove the lacquer, and with white spirit to remove the resin, but only the part covered with lacquer in the first stage comes away – I am not sure how this works chemically and need to think about it / research the process further. It seems as if the lacquer applied to the resin before it goes into the acid leaves it vulnerable to the solvents but the resin that is not so “protected” remains bonded to the metal….

As before, the plate is rinsed, oiled and inked prior to printing. There were some odd unplanned blotchy effects on the plate which were not there after the first acid bath and which appear to be the consequence of some unplanned chemical reaction. They showed up badly in the first print but made less of an impact in the second.

Here is the plate post-printing along with the second print. The parts of the plate which do not seem to have developed properly have produced smears in the central area on the left and right. These are more visible in the print than on the plate. I have taken the border away from the print in the photo in order that plate and print are to the same scale and can be compared as mirror images.

Final aquatint plate after second printing
Second printing of aquatint

Overall, I am very excited to have learned something about the rudiments of these processes, even though the artistic outcomes are nothing to write home about… I enjoyed the weekend immensely. Unfortunately, unlike some other types of printing, etching cannot be carried out at home. Prinitng presses are expensive and cumbersome but I will definitely attend more workshops in order to develop my skills.

So, finally, I can ask people to come up and see my etchings…!